|
Getting Started With The Starter Kit
by Donna Bayes
Where to begin?? You have this beautiful pink box sitting in front of you and you feel overwhelmed with all the things that are in it! First of all, open the Starting Points package and pop the CD into a player while you unpack everything else. Be sure to read the consultant's guide and all the training materials.)
What I want to address here is getting things set up to actually be able to USE the starter kit.
The Face Case
Open these up and get them ready for a facial.
 Print off six of these Party Trays, which are inserts that go under the clear plastic tray in the face case. The Face Case comes with a zippered mesh bag. In this bag put the following: Print off six of these Party Trays, which are inserts that go under the clear plastic tray in the face case. The Face Case comes with a zippered mesh bag. In this bag put the following:A "Tool Kit". Make up several of these kits and have them ready to include each time you clean a mirror and case (you will clean your mirrors after each facial to get rid of fingerprints and any makeup smudges, right? Tacky, if you don't!). You'll be ready for the next facial. This one idea will save you tons of time! The little baggie is great for the guest to take home their left-over samples. Hire your kids or some neighborhood kids to make these up for you.
Use a snack-size Ziploc bag or I like these self-sealing bags from www.mygirlfriendshouse.com.
3 cotton balls
Cotton swab
Sponge tip
Lip applicator or extra sponge tip for lipstick.
The mascara wand needs to just go in the goodie bag below, and not in this tool kit, because the cotton will get in the brush.
Goodie Bag
Goodie bags include..
The little tool kit from above
Mascara wand
Beauty Book
Business card
Color Card
Piece of candy
Disposable facial cloth from Section 2.
Sales Ticket
Don't forget to take profile cards. Fold a Profile Card in half and place in the face case.
Hair Clips--add a couple of duck bill hair clips or a head band to your zippered mesh bag.
Ink pen--You need an ink pen in each mesh bag for the guests to use to fill out their profile and sales ticket.
Color Samples For Facials
In my personal opinion, a new consultant can limit the colors she needs for the initial makeover, and then can use look cards for the checkup facial.
You can use the color cards that come in your starter kit
or
You can get the samples that go with the green, blue, hazel, and brown eye bundles.
Order the mineral eye shadow samples and then take the sticky back off the sample and stick them to these sampler cards.
Add a cheek color and a lip color and you have great color looks without spending a lot of money on samples.
or
Ivory and Beige women will do well with these colors, also.
Spun Silk Eye Color Samples
Hazelnut Eye Color Samples
Sunny Spice or Shy Blush Cheek Color Samples
Apricot Glaze Lip color
Bronze and Ebony women can use:
Honey Spice Eye Color Samples
Cinnabar Eye Color Samples
Cinnamon Stick Cheek Color Samples
Foundation Samples
Your Starter Kit came with several of the most popular foundation colors which are to be used as demos. You may want to open up, from your inventory, the colors that are missing. You can use one of your Velcro pockets on your starter kit to hold the Ivories, one to hold the Beiges, and, if you will be doing Bronze skin, one to hold the Bronzes. Since you only have Matte foundations as demos, remind your clients that you'll give them Luminous when they order, if that is the appropriate formula. You may have chosen the mineral powder foundation bundle, and if so, you may want to stock some foil sampler packets of each of the liquid foundations.
Tip: Matte Foundations absorb oil. Luminous Foundations add moisture.
So, I ask my client, "Do you want your foundation to absorb oil or provide added moisture?" Matte Foundation is great for the customer who has combination and oily skin. Luminous is great for normal and dry skin.
Use this chart to help you decide which foundation to give.
For ivory and beige skin tones, test the foundation color on the side of the neck. Robert Jones said that if it matches the neck, then it will be the correct color for the face. The foundation choice should be the one that disappears into the skin and is not noticeable when it is dry. I have found that testing on the side of the neck is the easiest way to quickly find the correct color. I love that one tip from Robert Jones. For bronze and ebony skin tones, do a stripe test down the cheek and jaw.
Organizing Your Class Supplies
Personally, I organize my class supplies by placing my demo items in a travel roll-up. One roll-up is my demo bag. And then I work right out of each pocket.
Pocket 1--Both formulas of TimeWise Cleanser and Moisturizer, Day and Night Solution, Velocity Cleanser and Moisturizer foil packets in case I need them, Acne Gel, and Oil Mattifier. All this fits into pocket one. I have whatever I need for skin care.
Pocket 2--All the Customized Skin Care Products I demo, including Satin Lips, Microdermabrasion, Oil-Free Eye Makeup Remover, Indulge Soothing Eye Gel, Age Fighting Eye Cream and/or Firming Eye Cream, Targeted-Action Line Reducer, and ink pens.
Pocket 3--Concealers (I've opened up one of each concealer to use as a demo); Loose Powders, Bronzers, and a filled custom compact to show, and mascara.
Pocket 4--Satin Hands
NSD Cindy Williams uses the Cosmetic Caddy (part #210600) to hold her demo supplies. Click here to see a picture of how it works. Thanks Cindy for your great pictures showing how you use this.
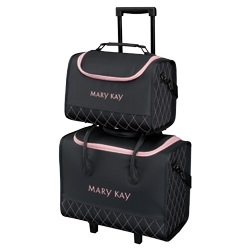
I purchased the Rolling Tote from MKConnections to carry my demo roll-up bag and other supplies. It is very nice and not as expensive as the Wheeled Cosmetic Carrier and will carry quite a bit. But you don't need it to get started. A tote bag, a box, whatever will work with your starter kit bag.
Tuck baggies with Spun Silk, Hazelnut, and Sunny Spice and a few choices of lipstick in the side.
Bring your Beauty Bash book, tuck in some Beauty Books, Customer Profiles, and Sales Tickets and you're ready to go!
Taking Inventory To Your Class
I have purchased the Insulated Organizer System from MK Connections. Find it under Business Gear. You'll want to purchase it when you can afford it. In the meantime, using a wheeled suitcase will work, or tote bags or boxes.
I have used a Plano Over and Under Tackle Box for years (before getting my Wheeled Cosmetic Carrier and Slip On Color Case). The Plano tackle box is a good alternative. All your glamour will fit in the lid in the little divided areas. My lipsticks all stand up in the bottom part, so you can read the names. In another section in the bottom I have mascaras, lip glosses, etc. Two of these tackle boxes will fit most of your inventory. The nice thing about it is you can just grab it and go. I sell out of it from home and then take it when I go out.
In the heat of summer, don't leave your products in a hot car. Take them inside your hostess' house. During more mild weather, you can leave them in your car and go out to your trunk to fill orders.
Don't leave your inventory in your car in the freezing dead of winter, either. Bring them inside at night.
Take Roll-ups for everyone. Assume they will all purchase a roll-up bag and have enough in your car to fill the orders.
Organizing and Storing Your Color Samples
Do you have a huge sack full of cheek, eye, and lip samplers and you don't know what to do with them?
If you don't organize them, you will be so frustrated when you try to find the right color.
Don't tear apart your samples. Leave them as they come from the company.
One idea is to get a small three ring notebook that is the size of the sample sheets. Three hole punch the sample spine and place them int his notebook in alphabetical order.
OR
Alphabetically place each sheet of cheek and eye samples into clear page protectors and label each page. Place these page protectors into a 3-ring binder, or divide cheeks into one binder and eyes into another one. Now you can just turn the pages to find the color that you need. You can easily see when you're running low on a certain sample.
Get a shoe box that is wide enough to hold the lip samples and the lip glosses. Use a large index card, standing on end, to divide the different colors. Again, sort them alphabetically. Write the name of each color on the end of the index card, so you can see it above the samples.
You can do the same thing for pencils and Eyesicles.
Actually, one of my consultants works for an eye doctor, and she gave me the coolest boxes that eye glasses come in. These large boxes are sturdy and have dividers separating the eye glasses. Perfect to sort our demos. Maybe you can ask for some boxes at your eye doctor's office.
When you go to a facial, pull out just the few samples you need and place into baggies, and you won't have to carry the boxes with you.
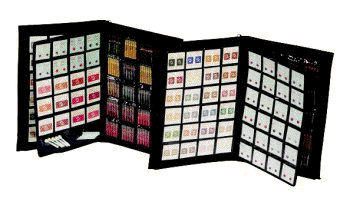
I have also invested in the Book of Colors from Sharodan. Go to www.sharodan.com and click on online catalog, then book of colors found in the left column. I keep six or so of each sample in this carrier. It only holds about 2 or 3 of each lipstick/gloss sample. My extras are stored in my boxes and in my 3-ring binder.
Book of Colors
|
Rolling Tote
|
|
|
|